Einleitung

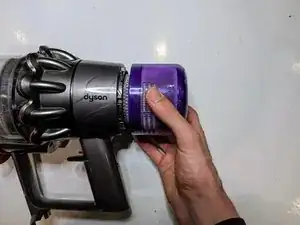
Diese Anleitung zeigt dir, wie du den Auslöser deines Dyson V11 Torque Drive Staubsaugers ersetzen kannst. Da der Auslöser aus Kunststoff besteht, kann er leicht brechen. Wenn der Auslöser deines Dyson V11 Torque Drive gebrochen ist, wird er nicht anfangen zu saugen. Auch wenn der Akku voll aufgeladen ist, kann der Dyson V11 Torque Drive nicht mehr starten. Nach dem Austausch des Auslösers sollte der Dyson V11 Torque Drive Staubsauger wieder betriebsbereit sein und mit dem Saugen beginnen.

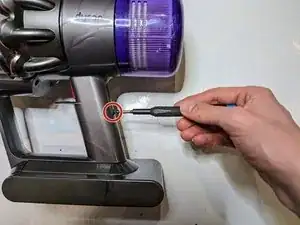
Für den Austausch des Auslösers am Dyson V11 Torque Drive Staubsauger benötigst du einen Kreuzschlitzschraubendreher #1, einen Kreuzschlitzschraubendreher #0 und einen Spudger.

  1. JREqCWfSTslHATyN
    • Entferne die einzelne Kreuzschlitzschraube #1 von der Rückseite des Handgriffs.

  2. aBoiEmNhQWqmf4dh
    • Entferne die beiden Kreuzschlitzschrauben #1 unten am Akku.

    La tête de la vis est abîmée à force d’essayer de la retirer

    Dany ENRICH -

    Comment faire pour l’enlever ?

    Dany ENRICH -

  3. KXV4BEbj6tsmnUV6
    • Ziehe den Akku nach unten und entferne ihn.

    when inserting new battery, don' push too hard you may damage the trigger plastic button

    mario -

    Traducción, gracias por el aporte Mario: al insertar una pila nueva, no presione demasiado fuerte, podría dañar el botón de plástico del gatillo

    Carlos López (España - Spain) -

  4. 5cGrfTywnITBmPaV
    5cGrfTywnITBmPaV
    EVAEqkdS2RZRJyeX
    • Drehe den Filter, schiebe ihn ab und entferne ihn.

    Buena tarde

    Nesecito la carcasa de la aspiradora

    Hugo Restrepo -

    Nesecito la carcasa de la aspiradora

    Hugo Restrepo -

  5. XJQS6YWQK5GGqpr3
    XJQS6YWQK5GGqpr3
    GjFY5tOxoEhJfYwb
    • Entferne die vier Kreuzschlitzschrauben #1 neben der Akkuanzeige.

    YOU MUST REMOVE THE BATTERY FIRST!! It is not apparent in this guide, but I almost got electrocuted when I went to remove the power in step 6!

    Ran Xiao -

    done the same once, but yeah always remove the power source before working on any appliance

    Ray Bradshaw (Falconsirrus) -

  6. TouXO1jXWOZTqPqW
    TouXO1jXWOZTqPqW
    qOT6w4tUI2WGhuKy
    • Entferne die beiden Kreuzschlitzschrauben #1 neben dem Handgriff.

    Heads up, my model of the V11 used Torx T8 screws here.

    Victor -

  7. WHZi2pCJvJm5nDuo
    WHZi2pCJvJm5nDuo
    fH4LkRXZOyXPWrjR
    • Löse den Handgriff und das Vorderteil vom Staubsauger ab.

  8. bBsXODjs6aX45DCE
    bBsXODjs6aX45DCE
    DafmKoDds5lXIsvC
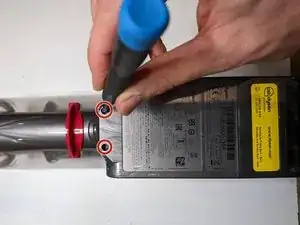
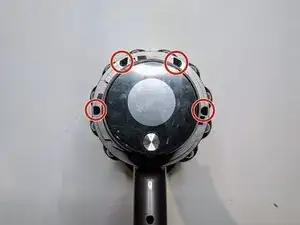
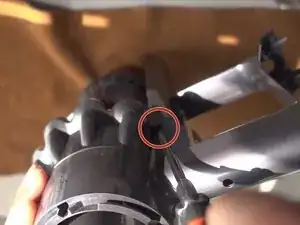
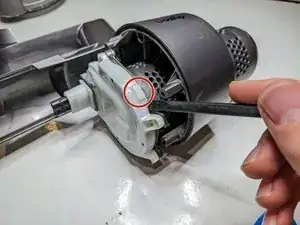
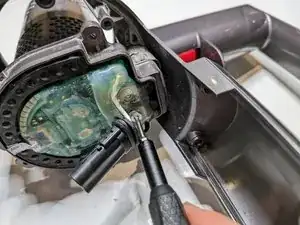
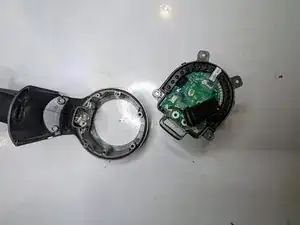
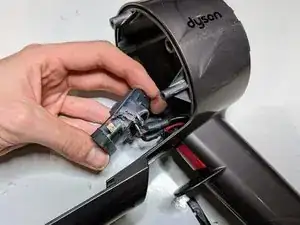
    • Entferne die beiden Schrauben von der Schutzabdeckung der Platine.

    • Bei einigen Modellen sind es Kreuzschlitzschrauben #0, bei anderen Torx T8.

    These screws were Torx #7 instead on my Dyson V11

    Lenno -

    Same for me.

    Beth Romanelli -

    its a T8 on all of the Dysons V10 and V11 at this stage

    Ray Bradshaw (Falconsirrus) -

    Efectivamente son necesarios un destornillador T7 y un T8

    Alberto Vazquez -

  9. QiFRpCChY4cyuRJ2
    QiFRpCChY4cyuRJ2
    j2XeeKK3nTM4do3Z
    UctQyjDigS4DwF5V
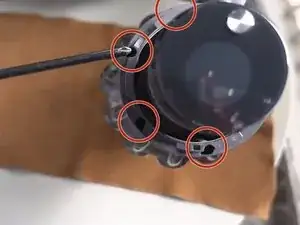
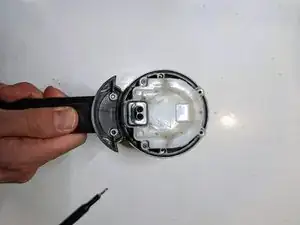
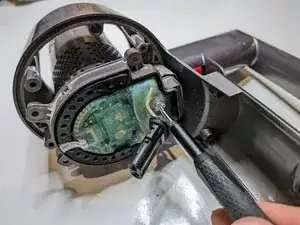
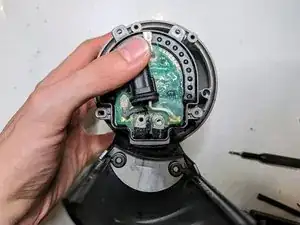
    • Das Gehäuse der Platine ist sehr hart und es kann schwierig sein, es zu entfernen. Am Besten nimmst du einen Spudger und hebelst damit nahe bei den rechteckigen Vorsprüngen, da über die Kunststoff-Rasten gehen.

    • Du kannst auch einen Jimmy an der Stelle unter das Gehäuse schieben, wo du gerade die Schrauben entfernt hast, dann hebeln und das Gehäuse an dieser Seite lösen.

    You need to pop the connector through the white cover to enable its removal.

    Chuck -

    unnecessary in my experience, just move out the way, unclip the tiny wire and remove the 2 power lines

    Ray Bradshaw (Falconsirrus) -

    The cover is clipped behind the small protrusions at 11 and 1 o'clock. You can see the counter parts in the image on the vacuum's body. I believe it is safe to pry the white protective case off.

    Jouni Reiman -

    An important addition: behind the cover, right at the two „more solid parts“ at the white cover, it is needed to unclip one little notch at each side. This two notches holds the white cover tight. So don‘t just wigle back and forth with a screw driver, try to unclip these notches.

    a.k.a.demiker -

  10. CCXLKCI2cdKXZyv1
    CCXLKCI2cdKXZyv1
    ANZoKNIKkDvPmPJx
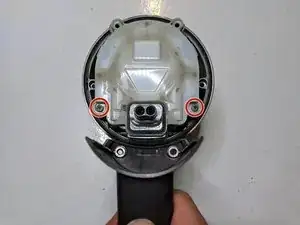
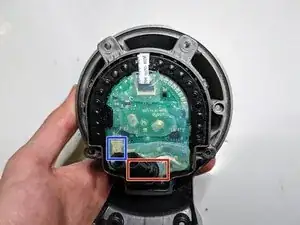
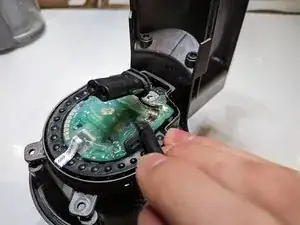
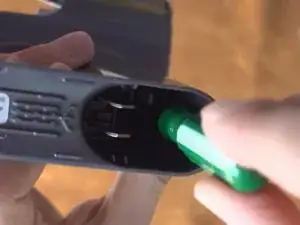
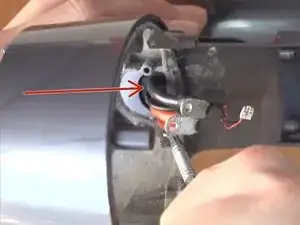
    • Die Platine ist wahrscheinlich mit einer großen Menge von durchsichtigem Kleber überzogen. Du musst an drei Dinge darunter herankommen: zwei Stromanschlüsse und das Kabel zum Schalter.

    • Schabe vorsichtig von den Schraubenköpfen und den Stromkabeln ab.

    • Verfahre genau so mit dem Kabel zum Schalter und seinem Stecker.

    • Wenn du ein scharfes Werkzeug verwendest, dann passe auf, dass keines der Kabel beschädigt wird.

  11. YCSKhYTBgZKFLdjE
    YCSKhYTBgZKFLdjE
    TEf3RAOKoxxR6qJS
    5HZtIWRuG1K2wRqX
    • Entferne die Schrauben, mit denen die Anschlusskabel befestigt sind.

    • Manchmal handelt es sich um Kreuzschlitzschrauben #1, manchmal um Torx T8.

    These screws were Torx #7 instead on my Dyson V11 and bth need to be removed and the pins plied back.

    Lenno -

    There are two screws (torx) here connecting both terminals to the motherboard. Also the pins need to be bent back to slow them to pull through. There was also a black wire that had to be disconnected.

    Chuck -

    your spot on there. like most metals bending more than necessary will snap them so be careful.

    Ray Bradshaw (Falconsirrus) -

  12. lPSQ1vVyVVlZuTWO
    lPSQ1vVyVVlZuTWO
    RBGkDQCSSN6nLJUf
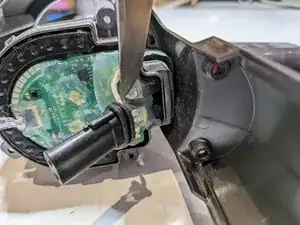
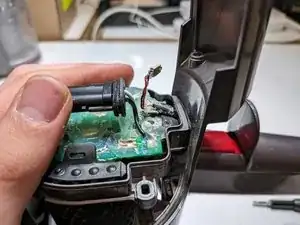
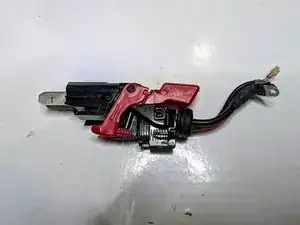
    • Trenne vorsichtig den Stecker der Einschalttaste ab und hebe das Kabel von der Platine nach oben, so dass die schwarzen und weißen Kabel nicht stört.

  13. yDa552GTij2diQRU
    yDa552GTij2diQRU
    U5J3JV5XxWrCIAGm
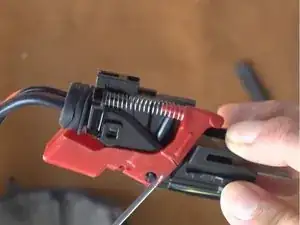
    • Verdrehe die Enden der Anschlusskabel, so dass sie leichter durch die Ausschnitte in der unteren Platine passen.

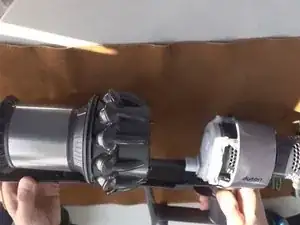
    • Entferne das Mittelteil des Außengehäuses. Im Idealfall kannst du die Kabel durch den Ausschnitt drücken, oft aber ist das etwas schwierig. Du benötigst wahrscheinlich recht viel Kraft, um das Mittelteil abzuziehen.

    At the point where it is recommended to twist the terminals, it helped me to bend the terminals a bit (less than a 90° angle, more in a straight line).

    a.k.a.demiker -

    Especially putting this part back together needs the terminals to be rotated to get them though. And one needs to be careful not to damage the thin wires from the trigger.

    Oskari Wäänänen -

  14. qGlZBjLMHsNtECQQ
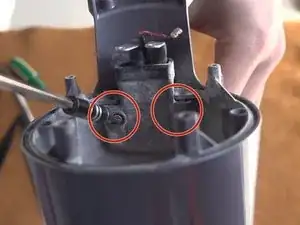
    • Entferne die einzelne Kreuzschlitzschraube #0 (bei manchen Modellen ist das eine Torx Schraube) im Inneren des Ladeteils.

    This screw was Torx #7 instead on my Dyson V11

    Lenno -

    What if the housing on that screw is broken? Is it necessary for that screw to be in place?

    BK Estis -

    No, the point of this screw is to fix the trigger assy inside the handle, technically when you refit the battery and screw in, it will all hold in place

    Ray Bradshaw (Falconsirrus) -

  15. 3pSvuZNberXpZuvj
    3pSvuZNberXpZuvj
    LvEDJgea2MaoPGml
    FoYY6uDsWBJT1FAn
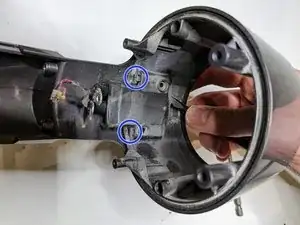
    • Entferne die beiden Schrauben vom Kabelgehäuse.

    • Je nach Modell sind das Kreuzschlitzschrauben #0. oder eine Torx Schraube.

    • Heble das Kabel nach oben um die Rasten zu lösen. Eventuell musst du mit einem Schraubendreher oder einer Pinzette auf die die Rasten drücken.

    • Schiebe das Gehäuse von den Kabeln ab.

    These screws were Torx #7 instead on my Dyson V11 and you need a very short screwdriver/ratchet or a flexible bit attachment.

    Lenno -

    T8 - i use a 100mm long shaft, it is at a bit of an angle but works fine

    Ray Bradshaw (Falconsirrus) -

  16. DCVOUUxZ4JPvFIUS
    DCVOUUxZ4JPvFIUS
    MeDFLs1way4seAYP
    no1SLBFrge4cJEMD
    • Drücke auf die im Bild markierte Stelle, um den Auslöser aus dem Ladeteil zu entfernen.

    • Dafür ist ziemlich viel Kraft nötig.

    pushing the trigger assy down tho the handle, well large screwdriver and small hammer works well, lol

    Ray Bradshaw (Falconsirrus) -

    Donde adquirir el gatillo.

    Muchas gracias

    Juan Pedro Molina de la Paz -

    Amazon renforcé

    Joseph Tartamella -

    Reaching up through the bottom with needle nose pliers and grabbing onto the plastic ridge below the main battery terminals and then pulling the assembly down through the handle is much easier

    Rupert -

Abschluss

Um dein Gerät wieder zusammenzubauen, folge den Schritten dieser Anleitung in umgekehrter Reihenfolge.

Beicheng Zhu

Mitglied seit: 15/01/22

956 Reputation

18 Kommentare

Some of the screws in this repair (step 8 and 9) require a T8 Torx bit instead of a Phillips. The Torx screwdriver should be at least 10 cm long and relatively thin to be able to fit into the base of the vacuum. The screwdriver I used from my iFixit essentials kit was too short and too wide to fit into the compartment. That should be added to the guide.

James Leung -

L'assemblage de cet appareil le rend assez compliqué à démonter... surtout la partie avec les câbles de puissance qui vont à la batterie.

Par expérience, en ce qui concerne la gâchette c'est faisable. La gâchette peut se trouver facilement sur internet, ça permet de réparer à pas cher et souvent certaines pièces génériques sont renforcées.

Brendan -

Also applicable to the v10. Some philips are T8 and as one comment already said, they need to be long and thin for some screws - but otherwise a good guide. Step 1 should be remove battery. My dust cover over the circuit board had little retaining clips which made it feel stuck. The small connector attaching the red/white wires lifts out vertically, with a little retaining clip. The final step, I needed a large screw driver to push the trigger part out. I couldn't get the leverage with the shorter spudger.

Ben Mason -

I chose to buy the full body and replace it after 6 years of use. I hadn't realized how the performance had degraded over time. My early release V11 animal with a screw on battery works better than new and now I have the upgraded display. I am going to deep clean the old body and replace the trigger as a backup but I didn't have a T8 long enough and skinny enough to remove all the screws.

Dave -

Missing the punch line! This is a good review all until the last step, which is INCOMPLETE and incorrect. The switch assembly must be removed from the arm, and this is much easier to do with a pliers than by pushing on the top. Once the assembly is removed, you must be careful to note the orientation of the broken switch trigger, remove the old, and replace the new trigger, not forgetting to attach the spring.

Paul Christensen -

I found this very helpful thank you, managed to fit a 3D printed replacement trigger which has a beefed up side to the section that breaks so hopefully will last forever now. Completed job cost $15NZD where as Dyson wanted to sell me a replacement motor body for $269NZD.

Ian Fussell -

Muchas gracias por tu post , acabo de cambiar el gatillo a mi dyson v11 absolute , gracias ati

Manuel Gato -

Just did it. Followed the instructions exactly. Excellent procedure, thanks! Saved me buying a new battery.

Gino -

Gracias. Guia perfecta para reparar el gatillo sin ser tecnico

Jose Manuel Giral -

Gracias por este magnífico tutorial, excelente.

Sin él me habría sido imposible cambiar el gatillo roto.

Me parece increible que sea tan difícil cambiar un simple gatillo, está claro que lo que quieren los de Dyson es que acudamos al servicio técnico ante la más mínima averia.

Saludos,

Antoni Tortella Soler -

Super Anleitung.....es hat absolut geklappt. Jetzt funktioniert der Staubsauger wieder. Das Auseinanderschrauben ist nicht einfach, da man nicht in jedem Baumarkt einen Torxbit 8 kaufen kann, bzw. einen entsprechend langen dünnen Torx 8. Und die ganze Arbeit nur wegen einem kaputten Drücker, der von Dyson eingebaut wurde. Das Teil ist einfach billig hergestellt....aber die Reparatur ist sehr aufwendig. Nochmals recht herzlichen Dank für diese wirklich tolle Reparaturanleitung !!!!!

KlausBeulerRohbau -

Magnifico tutorial, técnico y bien estructurado, muy profesional, conciso, eficaz y muy útil.

Muchas gracias

Juan A Ferlo -

Excellent guide. It was super helpful in getting my replacement done.

Does anyone know how this trigger actually works? I don't see any metal contacts that are being contacted.

boushley -

Hallo, ich habe heute die Anleitung genutzt und ich muss sagen, dass diese die Beste war, welche ich die letzten Jahre angewendet habe. Leider steht Dyson da nicht ganz so gut im Rampenlicht. Versucht mal diesen Auslöser einzeln zu bestellen. Da müsst ihr nämlich ein komplettes Gehäuse kaufen und dies für etwas um 140 €. Dies kann ich wirklich nicht nachvollzeihen zumal der Auslöser bereits nach vier Jahren defekt war. Vielleicht kann mir an dieser Stelle jemand einen Tipp geben, wo man einen solchen Auslöser bekommt.

Besten Dank noch einmal!

Werner Rentsch -

Muy ilustrado y detallado la publicación.

Juan Pedro Molina de la Paz -

j'ai suivi le processus decrit et c'est impeccable - il faut juste avoir un tournevis T08 bien solide pour devisser les cosses de puissances collées avec le mastic de protection répandu sur la carte electronique et assez long pour arriver à devisser la derniere vis en fond de poignée

JFB -

Vous êtes pas sur Bruxelles par hasard ? ! :D

Anouchka -

I had to replace the trigger/battery housing because of how I held the Dyson when emptying it.

As I now know, I should have the trigger finger outside the trigger, extended, pointing downwards towards the canister. Instead, I would always bunch fingers together on the handle. Eventually the flimsy piece of plastic that is the trigger guard snapped, leaving a jagged edge; lesson learned.

This guide greatly helped disassembly and do the replacement.

Victor -