Einleitung

Benutze diese Anleitung, um das obere Modul in deinem Fairphone 3 auszutauschen.

  1. VHPIvnAs3nZkjNpt
    VHPIvnAs3nZkjNpt
    WkeVErKujEGBBpg3
    • Schalte dein Handy aus, bevor du anfängst.

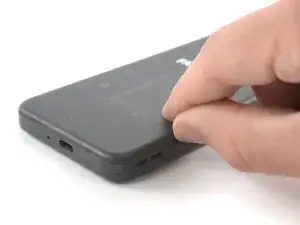
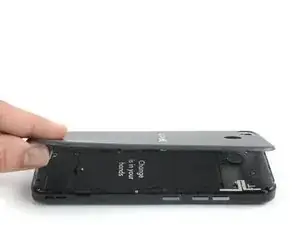
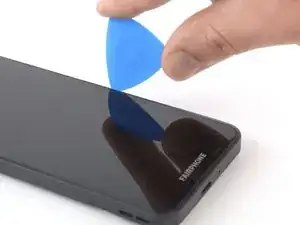
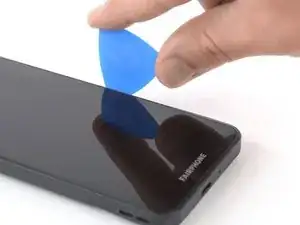
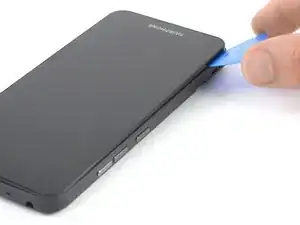
    • Setze deinen Daumennagel oder ein Hebelwerkzeug (z.B. Spudger) in die Kerbe unten rechts an der Rückabdeckung.

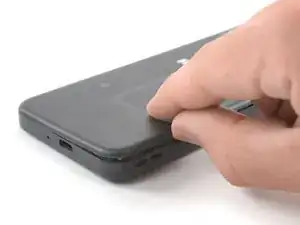
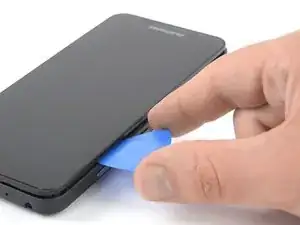
    • Heble die Rückabdeckung hoch, um die Plastikrasten zu lösen.

  2. aZKTuNxLDFBxQsex
    aZKTuNxLDFBxQsex
    ey144kaTLut2E5nl
    ZZNVj6GES5rFkHPm
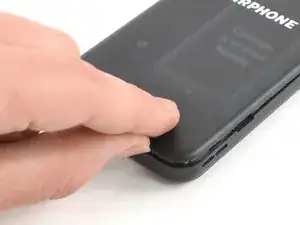
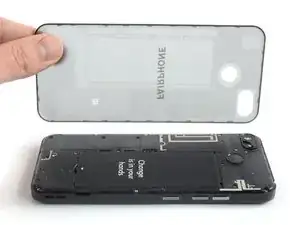
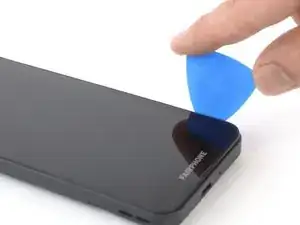
    • Arbeite dich um die untere rechte Ecke der Rückabdeckung herum, um die unteren Plastikrasten zu lösen.

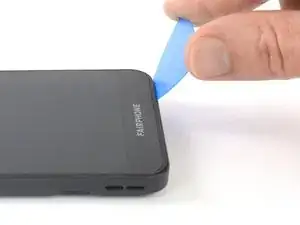
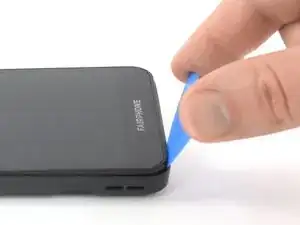
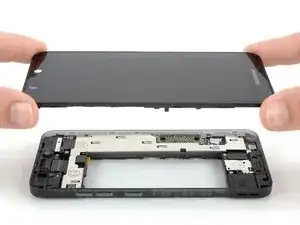
    • Hebe die Rückabdeckung an, um die restlichen Plastikrasten zu lösen, und entferne sie vom Handy.

    • Um die Rückabdeckung wieder anzubringen, drücke sie fest an, bis alle Plastikklammern hörbar einrasten, und die Rückabdeckung nahtlos in den Rahmen übergeht.

  3. SWtFbpWgIu4TxSFH
    SWtFbpWgIu4TxSFH
    TJYVdZMIZHXQFg2Z
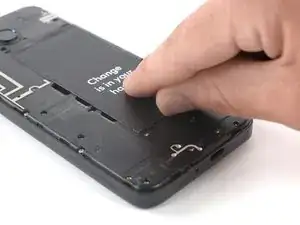
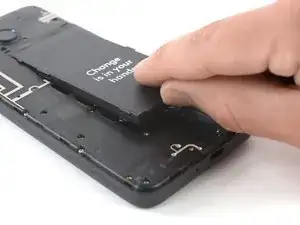
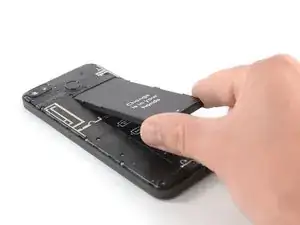
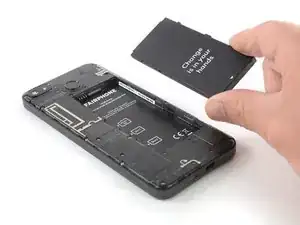
    • Benutze deinen Fingernagel oder ein Hebelwerkzeug (z.B. Spudger), um den Akku an der markierten Kerbe aus seiner Vertiefung herauszuheben.

    • Hebe den Akku an, bis du ihn gut greifen kannst.

  4. DWdxDSi4UvMe12h1
    DWdxDSi4UvMe12h1
    Abm5cDTFrqISPRmZ
    • Hebe den Akku aus seiner Vertiefung heraus und entferne ihn.

  5. K6p6TFBypXdBKHU3
    • Wenn wir Kreuzschlitzschrauben #00 erwähnen, kannst du sie auch mit einem #0 Bit oder Schraubendreher lösen.

    • Entferne die dreizehn Kreuzschlitzschrauben #00 (4 mm Länge).

    vis M 1.4/4 mm

    Felice Suglia -

    Attention : pour dévisser les deux vis du haut il est nécessaire d’avoir un tournevis assez fin, certains tournevis #0 seront trop gros et risquent de marquer les bords du trou, voire la caméra.

    pichel -

    I used the knife edge (on my suiss knife) and it worked fine. Of course, be very very carful not to damage the screws. In one hole I had to "sacrifice" a little bit plastic since the hole was a little bit too narrow for the knife.

    Evaf70 -

    no opening pick supplied with phone or part, it seems, and no picture of where to insert it

    Jean Anne Campbell Leith -

  6. RgOqQeFrvGJPrqe5
    RgOqQeFrvGJPrqe5
    SAiSkljUUHLACRCB
    FNDRJilOEUBAKGhs
    • Setze ein Plektrum an der rechten Kante des Handys zwischen Mittelrahmen und Display-Modul.

    • Achte darauf, das Plektrum zwischen den Mittelrahmen und das Displaymodul einzusetzen und nicht in schmalen Spalt neben dem Display. Sonst löst du das Glas vom Display ab, anstatt das gesamte Displaymodul.

    • Schiebe das Plektrum zur unteren rechten Ecke, um die Plastikklammern des Display-Moduls zu lösen.

    Hello. I do not have an opening pick; one was not provided with the telephone or the camera module. How am I supposed to install the item if I have not been either provided with, or informed of the requirement for, a necessary tool? This makes it extremely difficult for a customer to make their own installations or repairs. Also, I do not have a spudger, and I had to look up what a spudger is. These are not everyday items found in most people’s toolboxes, so I feel that they should be provided, or a warning should be given when buying items (such as the camera module) which will require additional tools to install.

    Helen Pearson -

    Hi, you are right, there should be a hint to buy those tools. Maybe you have a guitar pick or a very thin spatula or putty knife. It is better to not use metal, to not damage the frame, but if you have no other tool this may help.

    Fabian Gugger -

    Attention de bien insérer sur la rainure la plus à l'extérieur, vous allez sinon decoller le joint fixant l'écran à proprement parler au reste du module.

    Si ça vous arrive, vous le saurez en voyant que la partie décollée est toujours reliée par une nappe à la partie inférieure de l'écran. Pas de panique, appliquez quelques points de colle par dessus le joint d'origine et recommencez la procédure, cette fois dans la bonne rainure (et la procédure devrait vous paraître beaucoup plus simple ;) )

    Geoffrey Fernandez -

    Punaise, moi cette partie de mon écran se décolle toute seule. Juste un tout petit peu, par le haut. Vous me conseillez de le décoller plus pour pouvoir y mettre de la colle ?? Quelle colle serait le mieux ? (pas envie d’acheter un écran vu que le mien fonctionne très bien quand même)

    Lucy sann -

    Hello, I got frustrated when I didn’t find any opening pick. I’m not a guitarr player either ;-) , so I took a old credit card instead. It worked fine! I got a spudger when I bought the FP3.

    Anyway, these tools are not common in most households, so they should be provided or at least they should be hinted that they are needed.

    Mattias Ahlstedt -

    Hey, I cut the edge off a stiff plastic packaging and inserted it. It was itself too wobbly, but widened the gap enough so I could insert the edge of a credit card which worked just fine.

    Corinna Fischer -

    Ich hatte kein Plektrum habe es mit einer Chip-Karte probiert, das ging auch.

    Britta Hammer -

    If you have somewhat long nails you don't need a special tool to begin opening it. Following the frame afterwards is easy with a plain screwdriver.

    Carlos Izquierdo -

  7. 1SvcxAEamwNQ1QuK
    1SvcxAEamwNQ1QuK
    xZ65bOMs26GxAYZA
    • Schiebe das Plektrum um die untere rechte Ecke und öffne damit die unteren Plastikklammern des Display-Moduls.

    Hallo

    nachdem mein Handy ausversehen runtergefallen ist, war das Display dunkel; ein/aus half nichts, akku raus/rein auch nicht. Es gab Brumgeräusche wie beim Starten wenn ich Start gedrückt habe, das Display blieb dunkel. Ich konnte das Display mit etwas mühe(ungeübt) ausbauen und wieder einbauen. Danach ging es wieder; Danke euch hier für die Anleitung. So ein Plektrum habe ich leider nicht mehr, ich glaub es war eines dabei. Ich habe mir mit einem kleinen Plastiklöffel geholfen, der ist jetzt mein Star :-)

    Timo Strauß -

    Sehr gut! Viel Spaß mit deinem Fairphone!

    Fabian Neidhardt -

  8. 4yMFStDHFqMenoHu
    4yMFStDHFqMenoHu
    1H2TLWLSq5mXYbUx
    • Schiebe das Plektrum entlang der linken Seite, um das Display-Modul hochzuhebeln.

    • Das Display-Modul sollte sich bei diesem Vorgang vom Mittelrahmen lösen. Falls nicht, prüfe nochmals, ob alle Klammern gelöst sind.

  9. bIjVTLFAFNfHTjLK
    bIjVTLFAFNfHTjLK
    gKiTEgs2q4qGXYPA
    • Entferne die Displayeinheit.

    • Um das Display-Modul wieder einzubauen, drücke es an allen Seiten fest, sodass die Plastikklammern hörbar einrasten, um sicherzugehen, dass es bündig mit dem Rahmen abschließt.

    • Falls du ein neues Display einbaust: Das neue Display kommt mit einer weißen Abdeckung über den Anschlüssen, diese wird von zwei Schrauben gehalten. Entferne die Schrauben und die Abdeckung, bevor du das neue Display einsetzt.

    The new display module comes with a white plastic cover held by 2 screws over the processor and the connectors. This needs to be taken off!

    Joe -

    ATTENTION !l’écran neuf comprend un cache plastique qui tient avec 2 vis ! pour monter le nouvel écran il faut dévisser les vis et enlever le cache plastique

    Félix Béranger -

    Die weiße Plastikabdeckung an dem neuen Modul muss vor dem Einbau noch gelöst werden (2 Schrauben).

    Christian Schmidt -

    Vielen Dank für die kleinschrittige Anleitung, dir mir als Reparaturmuffel geholfen hat, mein Handy wieder zu aktivieren. Hintergrund: nach einem Sturz war das Display total verpixelt. Durch aus- und Einbau des Displays wurden die durch den Sturz gelockerten Kontakte wieder neu verbunden und - siehe da - es funktioniert wieder alles wie am ersten Tag! Da bin ich froh, daß ich mich für ein fairphone entschieden habe.

    Technikmuffel -

    Sehr gut! Weiter viel Spaß mit deinem Fairphone!

    Fabian Neidhardt -

    Nach dem Zusammenbau kommt kein Ton mehr heraus. Woran kann das liegen?

    Willi Koschutjak -

  10. IPanvfrdxrywm4D6
    • Entferne die beiden 4,1 mm langen Kreuzschlitzschrauben #00.

  11. slVBcnHMdnKxvN4T
    slVBcnHMdnKxvN4T
    BHPIdqYWCLFiwYeL
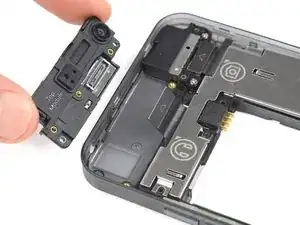
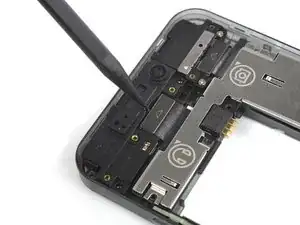
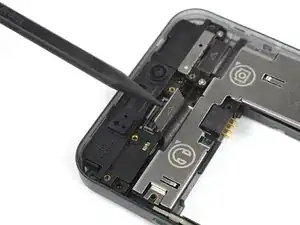
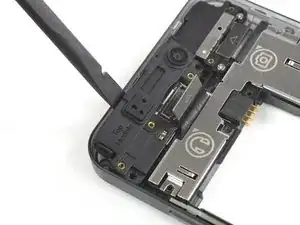
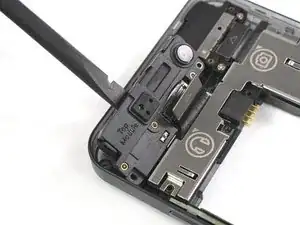
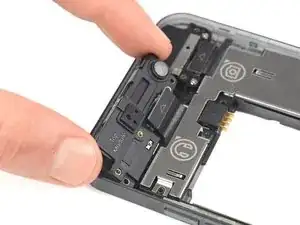
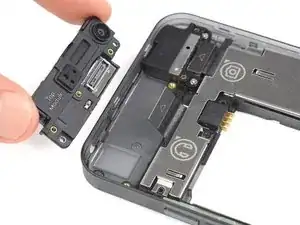
    • Benutze einen Spudger, um das Kabel, mit dem das obere Modul verbunden ist, hochzuhebeln und abzutrennen.

  12. psMvN2aLMfDWtP1m
    psMvN2aLMfDWtP1m
    LELhj1yW3UApgfUl
    • Heble das obere Modul mit einem Spudger von deinem Fairphone 3 ab.

  13. ujBoTwYEDTHCMZnB
    ujBoTwYEDTHCMZnB
    RW6HjcCJoGI6L2SV
    • Entferne das obere Modul mit deinen Fingern.

Abschluss

Um dein Gerät wieder zusammenzubauen, folge den Schritten dieser Anleitung in umgekehrter Reihenfolge.

Informationen dazu, was du mit deinem alten Modul machen sollst, findest du auf der FairPhone Support Seite und im FairPhone Forum.

Entsorge deinen Elektromüll fachgerecht.

Lief die Reparatur nicht wie geplant? Versuche es mit einer grundlegenden Fehlersuche oder bitte in unserem Forum um Hilfe.

Adriana Zwink

Mitglied seit: 18/12/19

56450 Reputation

3 Kommentare

I just did exactly that, and the camera won't work. both of the cameras. when I open the camera app, it is all black, and seems like still loading for around 10 seconds, and afterwards it prompts the error: "open camera error id =0".

I tried to replace it back to the old top module and the problem remained the same.. @fairops

tried the fairphone builtin checks from "myFairphone" app, and both front and back camera failed for not presenting anything.. used the automatic form to reach fairphone customer support, but they should reply me in about 9 days...

meanwhile I cannot use my phone camera!

so please if anyone knows how to handle it please help

Danks -

now I see I can't use my flashlight too, the button is disabled and it says "camera in use"... although the green sign that should be on the top right corner to inform of camera status does not appear, so it seems like the phone thinks the camera is in use although it is not in use... disturbing..

Danks -

solved! (kinda..)
the connecting part of the new top module I tried to install was dirty, and so, after installing it, the connecting part in the phone itself got dirty too, which blocked the old top module to connect back successfully.

after cleaning the old top module and the connecting part of the phone, the old top module connected back successfully!
although when I tried to clean the dirty new one(which caused the troubles from the first place), and connected it, it still didn't work.
so not greatly happy about it I keep using the old top module.

disclaimer: the new top module I tried to install was a top module from a fairphone that was ran over by a car, lucky me that other parts survived and I'm currently using them on my fairphone without any troubles.

Danks -