Einleitung
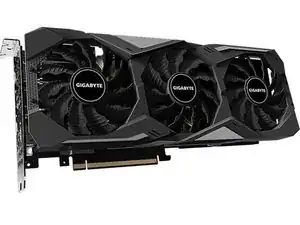
Führe die folgenden Schritte aus, um die 2070 Super-Grafikkarte gründlich zu reinigen und Wärmeleitpaste und Wärmeleitpads zu ersetzen.
-
-
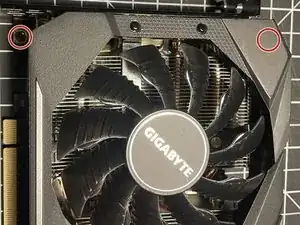
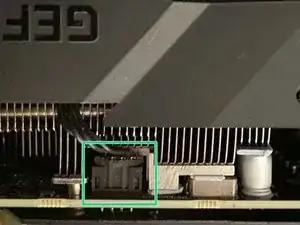
Benutze einen Kreuzschlitzschraubendreher PH#1, um die zwei Schrauben unter der Lüfterabdeckung zu lösen.
-
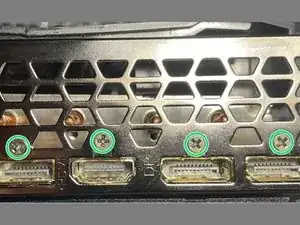
Drehe die Grafikkarte so um, dass du die DisplayPort-Anschlüsse siehst.
-
Benutze einen Kreuzschlitzschraubendreher PH#0, um die vier Schrauben über den Anschlüssen zu lösen.
-
-
-
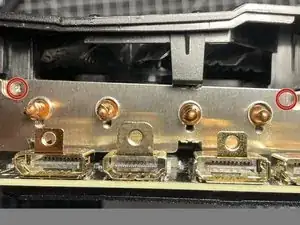
Benutze einen Kreuzschlitzschraubendreher PH#0, um die zwei Schrauben zu lösen, mit denen die Abdeckung befestigt ist. Drehe die Grafikkarte um 180° und wiederhole den Schritt mit den jeweiligen zwei Schrauben auf der anderen Seite.
-
Trenne die zwei Lüfterkabel von der Grafikkarte.
-
Ziehe jetzt die Lüfterabdeckung vorsichtig von der restlichen Grafikkarte.
-
-
-
Drehe die Karte so um, dass du die Rückabdeckung siehst.
-
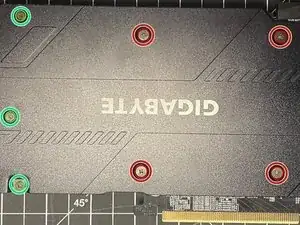
Benutze einen Kreuzschlitzschraubendreher PH#0, um die vier Schrauben zu lösen, die eine Feder haben.
-
Benutze den gleichen Schraubendreher, um die restlichen drei Schrauben zu lösen.
-
Drehe die Karte wieder in die Ausgangsposition um und entferne vorsichtig den Kühlkörper von der Karte.
-
-
-
Benutze den Kreuzschlitzschraubendreher PH#0, um die drei markierten Schrauben zu lösen.
-
Entferne vorsichtig die Rückabdeckung.
-
-
-
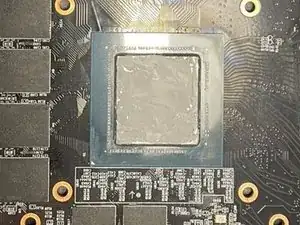
Benutze das Isopropanol und Wattestäbchen- oder Pads, um die Wärmeleitpaste vorsichtig von dem Kühlkörper zu entfernen.
-
Wiederhole den Schritt mit der CPU.
-
-
-
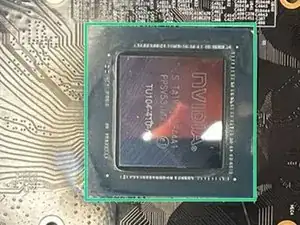
Trage eine geringe Menge der Wärmeleitpaste auf die CPU auf.
-
Benutze eine dünne Platte wie z.B. eine alte Bankkarte, um die Wärmeleitpaste über die komplette CPU zu verteilen. Achte darauf, dass keine Paste über die Kante hinaus quillt.
-
Wenn du die Wärmeleitpaste in warmem Wasser erwärmst, lässt sie sich meistens leichter verteilen.
-
-
-
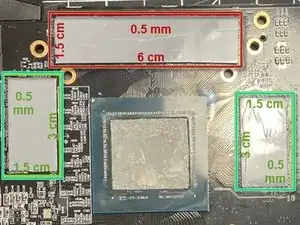
Entferne die VRAM-Wärmeleitpads. Oft kannst du sie einfach abziehen.
-
Reinige die Stellen, an der die Wärmeleitpads waren mit Isopropanol.
-
Platziere das längere Wärmeleitpad auf die VRAM-Chips oberhalb des Prozessors.
-
Platziere die anderen beiden Wärmeleitpads parallel zueinander auf die restlichen VRAM-Chips neben dem Prozessor.
-
-
-
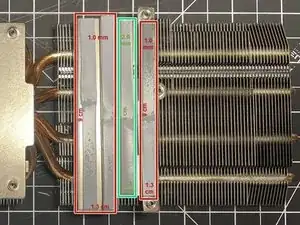
Entferne die alten Wärmeleitpads und reinige den Kühlkörper mit Isopropylalkohol.
-
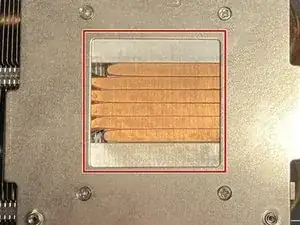
Nimm drei Streifen der 1,0 mm Wärmeleitpads in den Maßen 9 x 1,3 cm und befestige sie wie rot markiert am Kühlkörper.
-
Nimm einen Streifen der 2,0 mm Wärmeleitpads in den Maßen 9 x 1,3 cm und befestige ihn wie grün markiert am Kühlkörper.
-
-
-
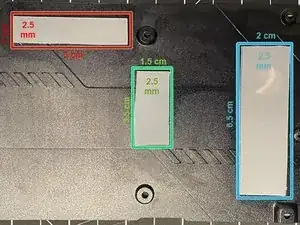
Entferne die alten Wärmeleitpads und reinige die Rückplatte mit Isopropylalkohol.
-
Nimm einen Streifen der 2,5 mm Wärmeleitpads in den Maßen 5 x 1 cm und bringe ihn wie rot markiert an der Rückplatte an.
-
Nimm einen Streifen der 2,5 mm Wärmeleitpads in den Maßen 3,5 x 1,5 cm und bringe ihn wie grün markiert an der Rückplatte an.
-
Nimm einen Streifen der 2,5 mm Wärmeleitpads in den Maßen 6,5 x 1,5 cm und bringe ihn wie blau markiert an der Rückplatte an.
-
-
-
Wenn die Videokarte gereinigt und alle Wärmeleitpads angebracht sind, dann folge den Schritten in umgekehrter Reihenfolge.
-

Führe die folgenden Schritte aus, um die 2070 Super-Grafikkarte gründlich zu reinigen und Wärmeleitpaste und Wärmeleitpads zu ersetzen.

13 Kommentare
Thank you so much. It was exactly what I was looking for.
steps 1 and 2 (fan shroud/display port shield) are unnecessary. The entire fan + heatsink assembly comes off in one piece and the DP shield stays attached to the board. Also on step 8, all of the pads are 1mm. The green one was not 2mm on mine. (measured with caliper, they are all identical)
Not Me -
On step 8, 9x1.3cm wasn't too wide? It looks more like 9x0.8cm.
Albert -
A couple of questions:
1. Is it ok to use 3mm pads instead of 2.5mm in the back plate?
2. On step 8, 9x1.3cm is way to big, it looks more like 9x0.8cm. Also can i use 1.5mm instead of the 2mm?
Albert -
Did you do it? What thickness did you use for the backplate?
Feixas -
Mine were already 3mm on the back. I wouldn't use a thinner pad than was already installed in case it no longer makes good contact, but I reckon you could get away with 0.5mm thicker on most of them without issue because they squash flat pretty well, almost like clay. (At least these Thermal Grizzly minus pads do)