Einleitung

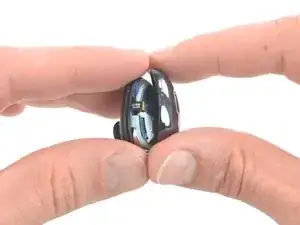
Nutze diese Anleitung, um einen schwachen oder kaputten Akku in deinen Galaxy Buds Live zu ersetzten. Die Bilder dieser Anleitung sind vom linken Ohrhörer, die Prozedur ist aber für beide Hörer die gleiche.

Galaxy Buds Live sind IPX2-zertifiziert, sie sind also gegen Spritzwasser geschützt. Nach der Reparatur könnten sie nicht mehr ganz so dicht sein.

  1. uQIxwDuNpBCcYSIu
    uQIxwDuNpBCcYSIu
    bKNbuSpnBsOkEkRC
    • Falls möglich, entlade deine Galaxy Buds Live, bevor du den Akku ersetzt.

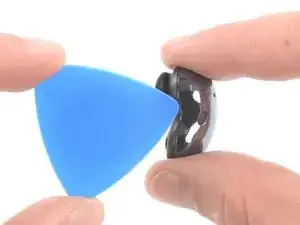
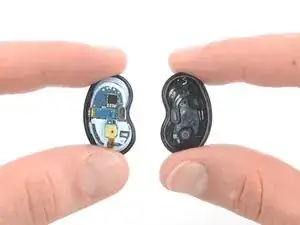
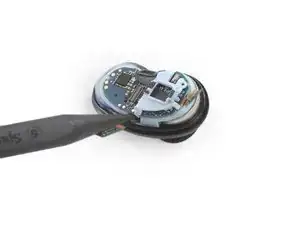
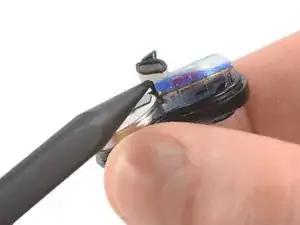
    • Setze die Spitze deines Plektrums an der gekrümmten Innenseite in den Spalt zwischen den Hälften.

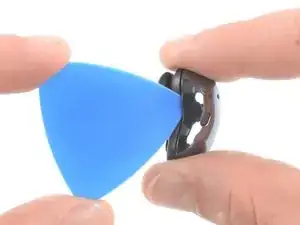
    • Setze das Plektrum in einem steilen Winkel ein.

    Before you begin, remove the rubber pads around the charging contacts (that help the bean stay in the ear). I did not and almost damaged mine while getting the battery out in the next steps.

    Kirill Elagin -

  2. S5gRE1uQfLas64kN
    S5gRE1uQfLas64kN
    fIFfC6krXZuuJCA5
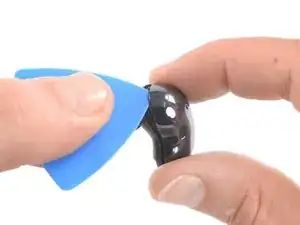
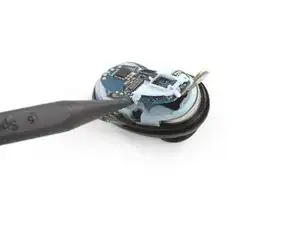
    • Halte das Plektrum in einem steilen Winkel und schiebe es nach oben, um das Gehäuse zu lösen.

    • Lass dir Zeit und achte darauf, dass du das Plastik nicht verformst.

    I found that trying to do this while inserting the pick at a steep angle caused it to snap and chip the paint.

    The easiest technique for me was to clamp the bud vertically, i.e. from top to bottom with just a regular clamp I use when gluing stuff – putting pressure vertically makes a little opening on the curve. Then I inserted the pick and removed it, which made the gap larger. Then I inserted a thin plastic spudger (iFixit Halberd Spudger) to keep the gap open, removed the bud from the clamp, and did a full circle with the pick.

    Kirill Elagin -

  3. NQravTwpyCtrfhRQ
    NQravTwpyCtrfhRQ
    W3cWYjhSAKWQAMHq
    • Entferne das Gehäuse.

  4. KJWOPkiQpIgr2j6w
    KJWOPkiQpIgr2j6w
    rLBBT5FHpXqR3Yyl
    • Nutze das spitze Ende deines Spudgers um den Anschluss des Hauptkabels zu lösen.

  5. I5l1PrFxbJUyRrQj
    I5l1PrFxbJUyRrQj
    QhHiIQvdxWVHZInP
    kD4fJSHqNsGCoCj4
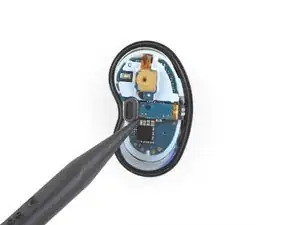
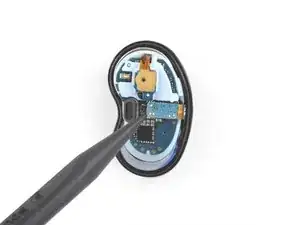
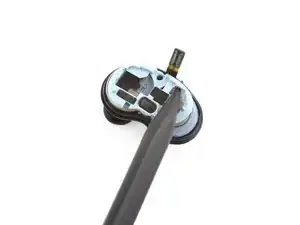
    • Nutze einen Spudger, um das Motherboard vorsichtig herauszuheben.

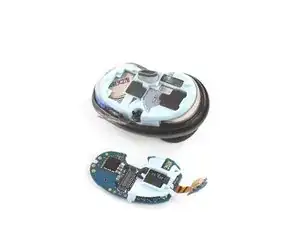
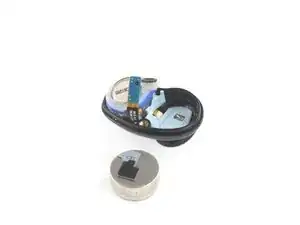
    • Entferne das Motherboard.

    There is a bit of glue on the side opposite to the main connector, so you insert the spudger at the main connector and then slowly ang gently keep tilting the mainboard. There is a plastic clip on the other side, but it get release exactly with this tilting motion, so don’t worry about it too much – just need to get past that adhesion.

    Kirill Elagin -

  6. PeGvMQIDFgt1Nmvd
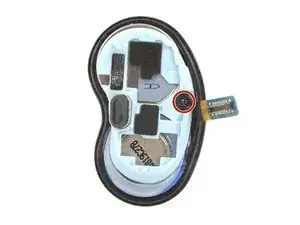
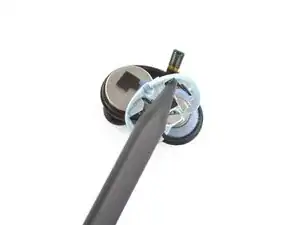
    • Nutze einen Kreuzschlizschraubendreher, um die 3,4 mm lange Schraube, die den Rahmen festhält.

  7. AJdHkSqLdtx4rrJn
    AJdHkSqLdtx4rrJn
    3EGQ51OqPWcigEhP
    DLgaMXVwcCVUnncV
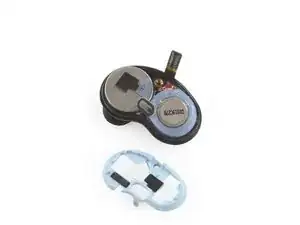
    • Nutze einen Spudger oder deine Finger, um den den Rahmen nach oben zu ziehen und ihn zu entfernen.

  8. hLmbu1yqThMJhIKj
    hLmbu1yqThMJhIKj
    nTmR3Rs2iGqaOqCm
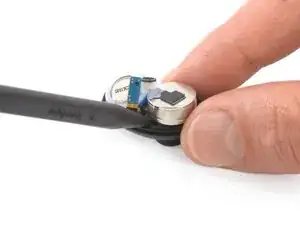
    • Nutze das spitze Ende eines Spudgers, um den Lautsprecher anzuheben, der auf dem Akku sitzt.

    • Der Lautsprecher wird von ein wenig Kleber gehalten. Sei vorsichtig und nutze nicht zu viel Kraft.

    I don’t think this step is necessary, you can get the battery out and back in without worrying about the driver. When doing the first bud, I tried following this step and, instead of the whole thing being lifted, as in the photos, in my case, only that plastic thing on top god lifted, showing the coil or something like that inside, which I cannot imagine being good.

    Kirill Elagin -

  9. wjD4SeHAEobIYFOw
    wjD4SeHAEobIYFOw
    HATaxsGXaZfZyWnx
    hqb2wHFsuAvCBaEh
    • Der Akku wird von ein wenig Kleber festgehalten.

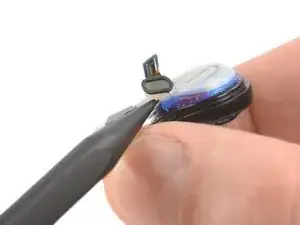
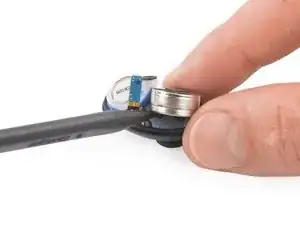
    • Setze das spitze Ende eines Spudgers unter den Akku.

    • Heble den Akku mit steter und gleichmäßiger Kraft nach oben.

    This is the hardest step. The adhesive holding the batter is only at the bottom, not around it. Not sure why but what helped me a lot was inserting the thin knify part of the Halberd Spudger at the side of the battery opposite to the main connector as deep as I could. And then just prying slowly and steadily from the main connector side, as in the photos.

    Kirill Elagin -

  10. 2tGpH6DADIEbHecG
    • Entferne den Akku.

    • Ein beschädigter oder verformter Akku darf aus Sicherheitsgründen auf keinen Fall wiederverwendet werden.

    The black sticky stuff on the bottom of the battery seems to be just adhesive – you can scrape it off and transfer to the new battery, although I am not sure if this will make any difference.

    The black-and-gray stuff on the top of the battery looks like it might actually have some function – padding or maybe transferring heat from the motherboard to the battery? Not sure, but I think it is good to transfer it. When scraping it off, start on the gray side, this way you’ll be able to pull the whole thing off. Do not stick it onto the new battery right away! Instead, wait until you screw the plastic frame in place – at which point you will see where exactly to stick the thing on the battery.

    Kirill Elagin -

Abschluss

Um dein Gerät wieder zusammenzubauen, folge den Schritten dieser Anleitung in umgekehrter Reihenfolge.

Für eine optimale Leistung "solltest du deinen neu eingebauten Akku kalibrieren:" Lade dein Gerät auf 100 % auf und lasse es zwei weitere Stunden am Ladegerät. Benutze nun dein Gerät, bis der Akku leer ist und es sich von selbst ausschaltet. Lade es dann ohne Unterbrechung wieder auf 100 % auf.

Entsorge deinen Elektromüll sachgerecht.

Hat die Reparatur nicht ganz geklappt? Versuche es mit ein paar grundständigen Lösungen, ansonsten findest du in unserem Forum Hilfe bei der Fehlersuche.

Adriana Zwink

Mitglied seit: 18/12/19

56450 Reputation

3 Kommentare

Thanks!!! This works great to clean the felt earwax filter underneath the metal grate as well!

Erin Rodriguez -

Graxias. Podrías indicarme la referencia de la bateria?

OMILU QUINTERO -

Thanks for the guidance.

It was easy to open the bud and to take it apart.

Just notice that there's no marking for + or - anywhere, to know on what side to put the battery. and the new one that I've got was wider then the plastic circle on the original battery.

Hananya Krishevsky -