Einleitung

Diese Anleitung zeigt, wie ein defektes Display im MacBook Air 2022 (M2) getauscht werden kann.

Hinweis: Nach dem Austausch des Displays funktioniert True Tone nicht mehr.

Hinweis: Bei diesem Laptop gibt es Standard Torx und Torx Plus (IP) Schrauben. Falls du nicht alle passenden Torx Plus Schraubendreher hast, kannst du auch Standard Torx Schraubendreher verwenden. In diesem Fall musst du beim Ausdrehen der Schrauben fest und gleichmäßig nach unten drücken, damit die Schraubenköpfe nicht beschädigt werden.

Hinweis: Wenn dein Ersatzdisplay nicht mit einem Öffnungswinkelsensor ausgestattet ist, dann benötigst du ein 1IP Torx Plus Bit, um den Sensor zu entfernen und zu übertragen.

  1. lquDimvZWHVcGkIF
    lquDimvZWHVcGkIF
    MrBPlfJiyDeCh3Xy
    GiVPDUTQKCcVHQEp
    • Bevor du beginnst, entlade deinen Akku auf unter 25%. Ein geladener Lithium-Ionen-Akku kann sich entzünden und/oder explodieren, wenn er bei der Reparatur versehentlich beschädigt wird.

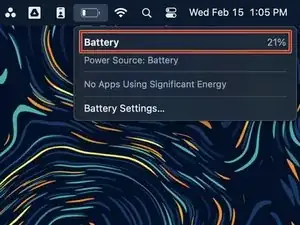
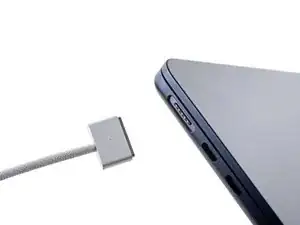
    • Fahre dein MacBook herunter und stecke alle Kabel aus.

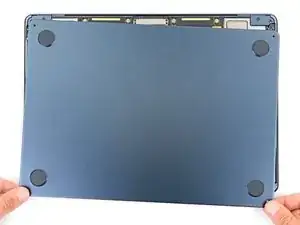
    • Schließe den Bildschirm, drehe Laptop um und lege ihn hin. Öffne den Laptop erst wieder, nachdem der Akku abgetrennt wurde.

  2. UU3OByKvXHdj5Y2H
    UU3OByKvXHdj5Y2H
    IiKX3lhcjAkhlYAf
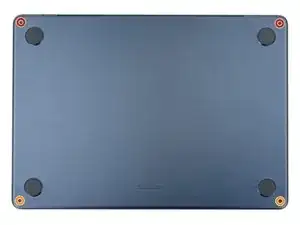
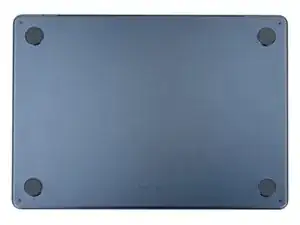
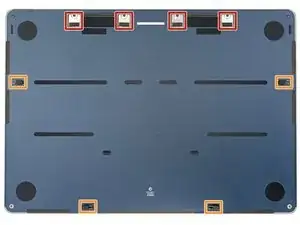
    • Entferne die vier 6,4 mm langen Pentalobe P5 Schrauben, mit denen das Gehäuseunterteil befestigt ist:

    • Zwei Schrauben mit einem kurzen Gewindeteil in der Nähe der Scharniere

    • Zwei Schrauben mit einem langen Gewindeteil an der Vorderseite des MacBooks

    • Halte die Schrauben während der Reparatur gut geordnet und achte darauf, dass jede wieder an ihren ursprünglichen Platz zurück kommt, sonst kann das Gerät beschädigt werden.

  3. dokINhbATeVrKXtr
    dokINhbATeVrKXtr
    TjUylLnpiHfWk2sV
    m6fVPUBtNhtoYYHl
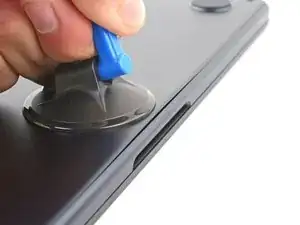
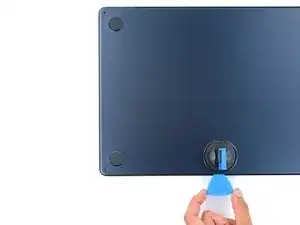
    • Drücke einen Saugheber in der Mitte der vorderen Kante auf das untere Gehäuse fest.

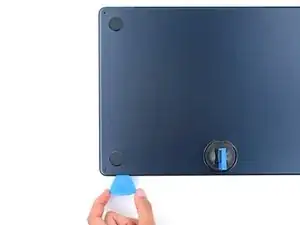
    • Ziehe den Saugheber fest und gleichmässig hoch, bis ein schmaler Spalt zwischen dem Gehäuseunterteil und dem Rahmen entstanden ist.

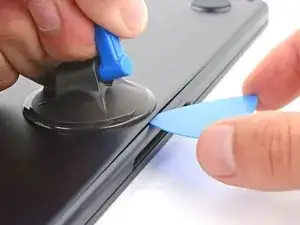
    • Setze ein Plektrum in den Spalt ein.

  4. BoDqyqxbGBlggTvo
    BoDqyqxbGBlggTvo
    pY1Qrw1jHD1iDd2b
    UBVsUaYNRIMIAlaU
    • Während jedem der nächten vier Schritte solltest du spüren und hören, wie sich die einzelnen vier Klammern lösen. Wenn nicht, setze das Plektrum tiefer ein und versuche es erneut.

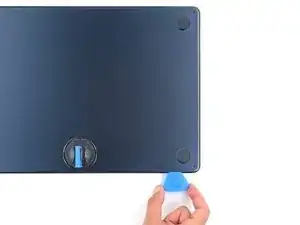
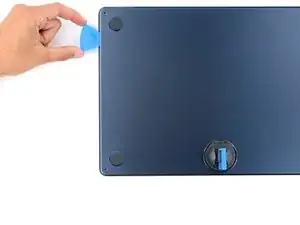
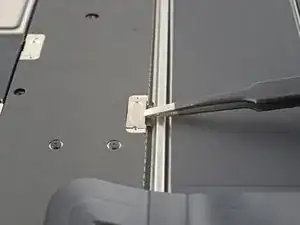
    • Schiebe das Plektrum in die untere rechte Ecke um die erste Klammer zu lösen.

    • Schiebe das Plektrum um die Ecke herum und an der rechten Kante nach oben, so dass sich die nächste Klammer löst.

  5. BkegaQVYCGs6e6uo
    BkegaQVYCGs6e6uo
    uARqMGT1yaE2uhOn
    Lo1ugnNCtcNL1Qyj
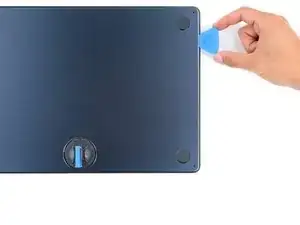
    • Setze das Plektrum in den ursprünglichen durch den Saugheber erzeugten Spalt ein.

    • Schiebe das Plektrum nun um die linke untere Ecke und dann an der linken Seitenkante entlang nach oben, um die restlichen zwei Klammern zu lösen.

  6. JxjCoOqbtL6riXKd
    JxjCoOqbtL6riXKd
    bXZHWpvubTHOOBVP
    AuNBkdMIobCVlYIC
    • Das untere Gehäuseteil des MacBook Pro ist mit vier Schublaschen fest verbunden. Um diese Laschen zu lösen, brauchst du ziemlich viel Kraft. Um deine Hände vor Verletzungen an den scharfen Kanten des unteren Gehäuseteils zu schützen, solltest du Handschuhe tragen.

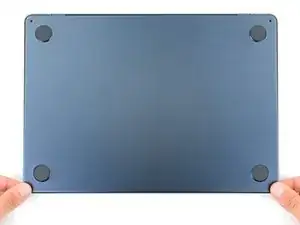
    • Halte das untere Gehäuseteil flach und ziehe es fest und gerade von der hinteren Kante weg, und zwar jeweils eine Ecke nach er anderen, bis sich die Schublaschen lösen.

    • Ziehe die Abdeckung nicht nach oben, bevor sie ganz abgetrennt ist.

    It's obvious once you know how, but I think that stating the direction of force you apply to the lower case (towards the front) to separate the sliding tabs would be helpful.

    Thank you for the great instructions!

    Tatsuya Takahashi -

    The back tabs are meant to slide down towards the track pad. Do not pull up on the back tabs

    nick mulvaine -

    Using the iFixit opening tool from the toolkit and applying a moderate amount of force between the edge of the lower case and the inner lip of the main body (not the hinge!) worked better for me.

    Zach -

  7. dQ1idM13kbRF6NQC
    dQ1idM13kbRF6NQC
    UqDpUWQXDrMQDWSf
    bXP3i6XCG1BSaeBP
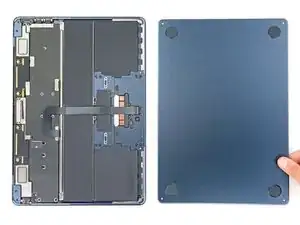
    • Entferne nun das untere Gehäuseteil.

    • So wird es wieder zusammengebaut:

    • Setze das untere Gehäuseteil auf und richte die Schublaschen mit den Schraubenköpfen, die sie verdecken, aus. Drücke das untere Gehäuseteil herunter und schiebe es zur hinteren Kante hin, bis die Laschen einrasten. Halte dann an.

    • Wenn eine Lasche eingerastet ist, passt die andere vielleicht nicht mehr richtig. Kontrolliere beide Laschen während du schiebst, an der Rückseite darf kein Spalt sein.

    • Wenn die Schiebelaschen vollständig eingerastet sind und das untere Gehäuse richtig ausgerichtet aussieht, drücke es ringsum fest nach unten, um die darunter liegenden vier Clips einrasten zu lassen.

    • Du solltest vier klare Klickgeräusche hören und fühlen, wenn sie wieder einrasten.

    I'd bet that if iFixit was to source upgraded replacement lower case 'feet' with a material like nearly any earlier macbook air or pros had--less hard and slippery--they'd sell a lot of them. I'd buy several sets. The OEM feet are horrible and not very 'Apple' in quality.

    Walt Keyes -

  8. DP2BQNffNgdKM1dp
    • Entferne die beiden 1,5 mm langen Torx T3 Schrauben, mit denen die Abdeckung des Akkusteckers befestigt ist.

  9. 2UVCE1lqOt3ViR3I
    2UVCE1lqOt3ViR3I
    JCSnLNLOpWoUBEM2
    • Entferne die Abdeckung des Akkusteckers.

  10. TLUsv2wJrhFsJtLN
    TLUsv2wJrhFsJtLN
    TnjVCuugvheTD3RO
    • Heble den Druckstecker des Akkus mit einem Plektrum hoch und trenne ihn ab.

    • Um einen Druckstecker wieder anzuschließen, musst du ihn erst über dem Anschluss ausrichten. Drücke ihn dann auf einer Seite herunter, bis er einrastet, wiederhole anschließend auf der anderen Seite. Wahrscheinlich benötigst du mehrere Versuche, bis es klappt.

  11. kebHJh5MREfKeChO
    kebHJh5MREfKeChO
    yXHTMYe5o5TVlUuK
    • Löse den Schaumstoff von der Abdeckung des unteren Displaykabels ab und entferne ihn, so dass eine verborgene Schraube sichtbar wird.

  12. pjRhqAUyNflDff11
    pjRhqAUyNflDff11
    G4LVwJqoNfMsUjLG
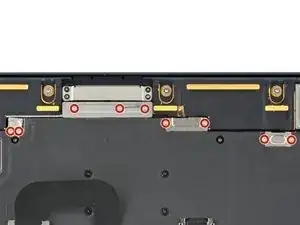
    • Entferne die neun 1,5 mm langen Torx T3 Schrauben, mit denen die Metallabdeckungen befestigt sind.

    As noted above these might also be T4 instead of T3, I stripped one with a T3 bit. Mine were definitely T4

    Aron List -

    Using a brand new Wiha kit (which I needed to order because I lacked the needed T1 for step 25), the screws were T3, a T4 was too big.

    maccentric -

  13. VMlF1HrcBYvSDd3o
    VMlF1HrcBYvSDd3o
    doXD6KcTgJkt4ucJ
    QLF2TxIuoaHMLpIw
    • Entferne die vier Metallabdeckungen:

    • Zwei Abdeckungen der Lautsprecherkabel

    • Eine Abdeckung des Displaykabels

    • Eine Abdeckung des Antennenkabels

  14. WdEgU3GTuVFipCQk
    WdEgU3GTuVFipCQk
    BhhFHQctRcdKgjsN
    • Entferne die vier Schrauben, mit denen die Abdeckung des oberen Displaykabels befestigt ist:

    • Zwei 2,5 mm lange Pentalobe P2 Schrauben

    • Zwei 2,5 mm lange 3IP Torx plus Schrauben

    • Beim Wiederzusammenbau müssen die Pentalobe-Schrauben in die Halterung für das Displaykabel eingeschraubt werden.

    I found that using a P1 was necessary as the P2 doesn't fit. It could also be the screws that were installed vary slightly.

    Tech Medic -

    I think you need a new p2 bit

    James Swafford -

    Mucho cuidado, aunque los tornillos estén duros, si se hace demasiada fuerza hacia abajo pueden romperse los soportes inferiores.

    Alquimista -

  15. lPGy5JtEQEfCtMaY
    lPGy5JtEQEfCtMaY
    kcjcxCBvaCSV4l3M
    cvjfTvDUkaRqOv2s
    • Entferne die Abdeckung des oberen Displaykabels und die Kunststoffhalterung.

    • Achte beim Zusammenbau darauf, dass sich die Oberkante der Abdeckung des oberen Displaykabels unter der Kunststoffhalterung befindet.

  16. AaItWhYWgF4NCOS3
    AaItWhYWgF4NCOS3
    1SeLoNYbL5PJFawE
    UGnZW2dNuEo4ydXY
    • Heble die Druckstecker an den beiden Displaykabeln mit der Spudgerspitze hoch und trenne sie ab.

    Replacement display did not include metal bracket shown here, which has adhesive on both sides. Pay close attention to how ribbon cables wrap around this bracket.

    MotorMac -

  17. gGeimEZN1t3ZefTN
    gGeimEZN1t3ZefTN
    OWD6hlIIIVxEp1Hb
    lMqGyxOUdHugIn6F
    • Trenne die Druckstecker des rechten und des linken Lautsprechers ab.

  18. fVUH1ATQPKSEoabj
    fVUH1ATQPKSEoabj
    yjjDm12OJIyWpmfp
    nWOQCORMsyE4n31l
    • Fasse den ersten Antennenstecker so nahe wie möglich am Anschluss mit einer Pinzette an.

    • Hebe ihn hoch und trenne das Kabel ab.

    • Die Antennenstecker auf dem Logic Board sind sehr empfindlich. Ziehe sie beim Abtrennen senkrecht hoch, biege sie nicht zur Seite.

    • Wiederhole alles für das zweite Antennenkabel.

    • Um Antennenstecker, so wie diesen hier, wieder anzuschließen, musst du ihn erst über seinem Anschluss ausrichten und dann mit dem flachen Ende des Spudgers nach unten drücken. Der Stecker sollte dann einrasten. Das kann etwas knifflig sein und du musst es eventuell mehrmals versuchen.

  19. DDIPSiG3ONrTAMKR
    DDIPSiG3ONrTAMKR
    DTuoswscnYTSgptH
    • Die Köpfe dieser Schrauben können leicht rundgedreht werden. Drücke fest und gleichmäßig nach unten, damit dies nicht passiert.

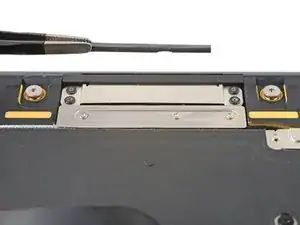
    • Entferne die beiden 2,6 mm langen 3IP Torx plusSchrauben, mit denen die rechte und die linke Scharnierabdeckung befestigt ist.

    These screws were really hard to remove. I suggest being VERY careful. They both stripped almost immediately and getting them out was nearly impossible. I'd suggest VERY carefully making sure that your driver bit fits before applying any force at all here. The first one I tried didn't work at all.

    fiddlefro -

    Thanks for advice.
    Found them a bit hard to wiggle loose after getting the screws out - they seemed glued in. Was terrified of applying force, slipping and then breaking something, but I was okay. Left one was harder.

    James Waters -

    I was able to use a S2 T4 bit that I found in a odd set that I have. It seems to work well on the ones that I have tried.

    NotAnonymous -

  20. SoPUTsoDQvR6c2NM
    SoPUTsoDQvR6c2NM
    uBZBIDuPfjmWjZ4Y
    3SJMRQgSp1V3A2sn
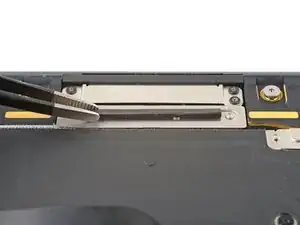
    • Fasse die Abdeckung des linken Scharniers mit einer stumpfen Pinzette.

    • Ziehe die Abdeckung zur Unterkante des Laptops hin und gleichzeitig nach oben, bis sie sich aus ihrer Vertiefung löst.

    • Ziehe die Abdeckung nach oben und entferne sie.

  21. qy4bIsBbWq14nCSp
    qy4bIsBbWq14nCSp
    qLXsSe6RtWMYfAhe
    VDc6oEDWEfCIuHHc
    • Wiederhole den vorigen Schritt für die Abdeckung des rechten Scharniers.

  22. FpvakmI2uZIFAWBN
    FpvakmI2uZIFAWBN
    xf3ZHrsQqUnLrxLu
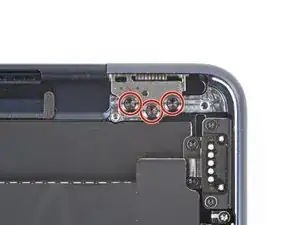
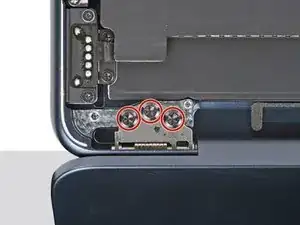
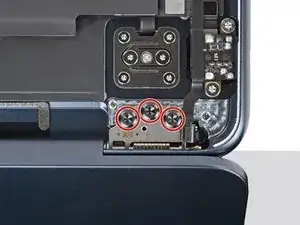
    • Entferne die sechs Schrauben, mit denen der rechte und der linke Lautsprecher befestigt sind:

    • Vier 5,6 mm lange 4IP Torx plus Schrauben (zwei an jedem Lautsprecher)

    • Zwei 3,5 mm lange Torx T5 Schrauben (eine an jedem Lautsprecher)

    On the A2681 that I am working on, the Four 5.6mm (highlighted in red) were T3 screws, ( not T5 as noted as of 1/2/2025 )

    Brendan Cheever -

    Do not remove

    Justin Davis -

  23. JEgltbEB3uMuIEqf
    JEgltbEB3uMuIEqf
    oF6IWOmlttuipHPC
    2PX6WGhGkM2eCMFv
    • Hebe die Lautsprecher gerade nach oben und entferne sie.

    Do not remove

    Justin Davis -

    With the speakers installed the lid fouls on them and can't be removed. Maybe subtle differences between different units...

    John McKee -

  24. G2OdSCNXeZj4fnAG
    G2OdSCNXeZj4fnAG
    xXddfMFX5lteQkvK
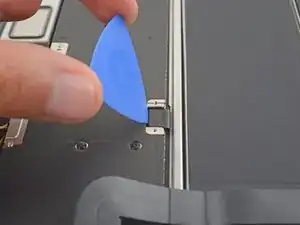
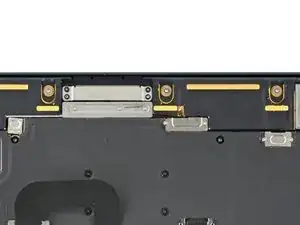
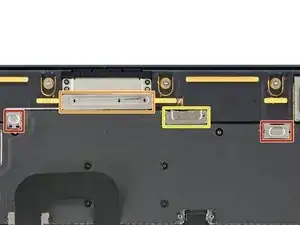
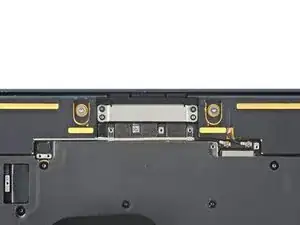
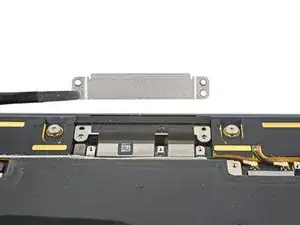
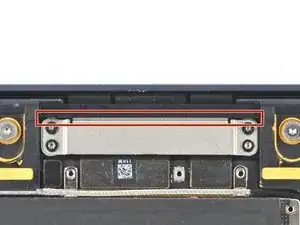
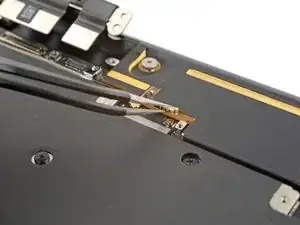
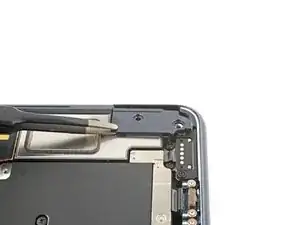
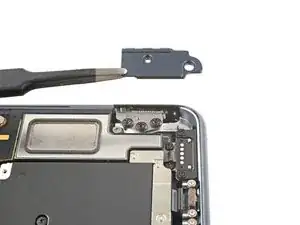
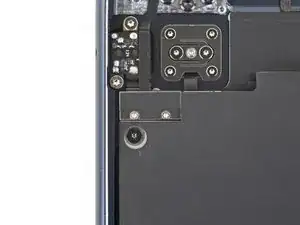
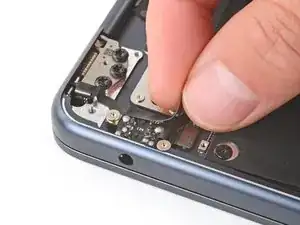
    • Entferne die beiden 1,5 mm langen Torx T3 Schrauben, mit denen die Abdeckung am Stecker des Öffnungswinkelsensors befestigt ist.

  25. YhWpDXiYFtrFSkhE
    YhWpDXiYFtrFSkhE
    CToeIWWrF2qBPjGQ
    • Entferne die Abdeckung am Stecker des Öffnungswinkelsensors.

  26. eKRIOkWSNDyemNUp
    eKRIOkWSNDyemNUp
    CcW2RIOY6sHW1RBE
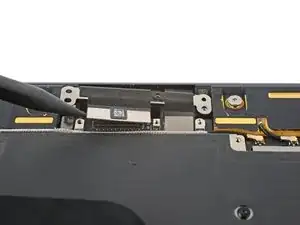
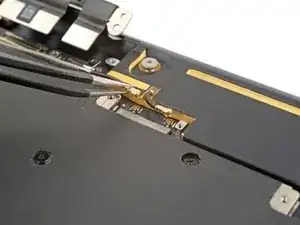
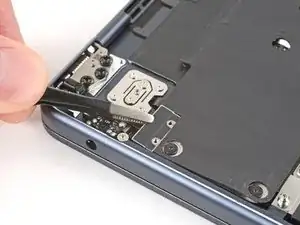
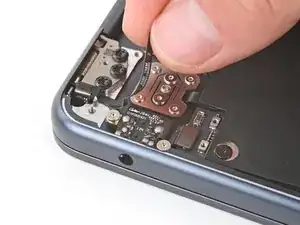
    • Heble den Druckstecker des Öffnungswinkelsensors mit der Spudgerspitze nach oben und trenne ihn ab.

  27. DoIYtXAR2gQpNLFB
    DoIYtXAR2gQpNLFB
    DDZaiy4KaqHELxyC
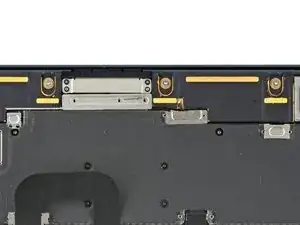
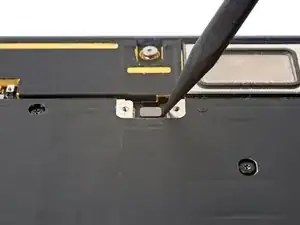
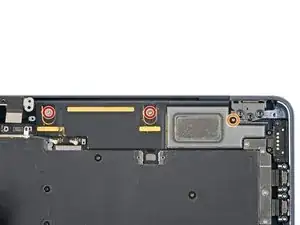
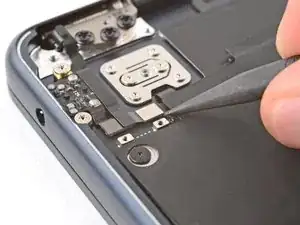
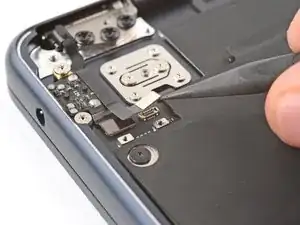
    • Löse das Kabel zum Öffnungswinkelsensor behutsam von der Oberseite der Kopfhörerbuchse ab und biege es zur Seite.

  28. sWAdJB3PuSNICII2
    sWAdJB3PuSNICII2
    Shb4WxQWrDVrgxUS
    G5T2cZmEtp2vVsd1
    • Überprüfe, ob am Scharnier deines Ersatzdisplays ein Öffnungswinkelsensor installiert ist. Wenn das so ist, überspringe diesen Schritt. Anderenfalls folge den Anweisungen, um den Sensor zu entfernen. Du musst ihn später auf das Ersatzdisplay übertragen.

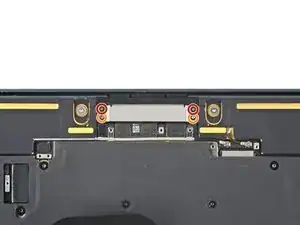
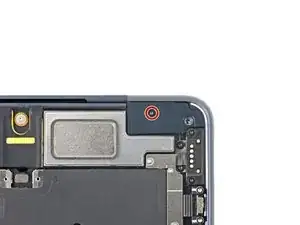
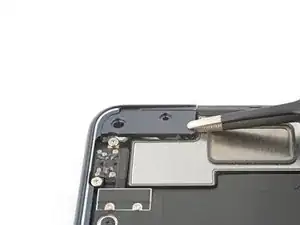
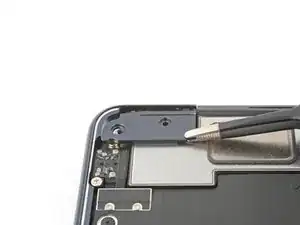
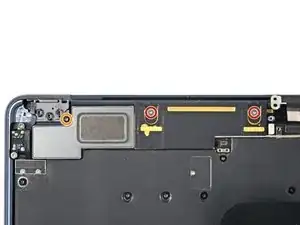
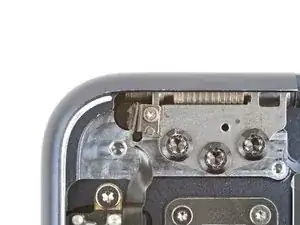
    • Hebe die Klappe über der Schraube des Öffnungswinkelsensors am linken Scharnier mit der Spudgerspitze hoch.

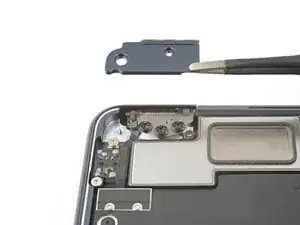
    • Nimm einen 1IP Torx Plus Schraubendreher und entferne die Schraube des Öffnungswinkelsensors.

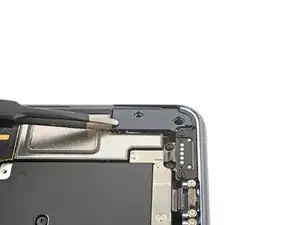
    • Entferne den Öffnungswinkelsensor und lege ihn für den Zusammenbau zur Seite.

  29. ANOYMMh5p4BWfFag
    ANOYMMh5p4BWfFag
    QhjyalsdW4dJPeo4
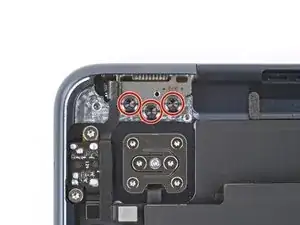
    • Nimm einen 8IP Torx plus Schraubendreher und löse (nicht entferne) die sechs Scharnierschrauben.

  30. hd4RQtsjhb3D3LpT
    hd4RQtsjhb3D3LpT
    FjIEBwbJOxYRpAv5
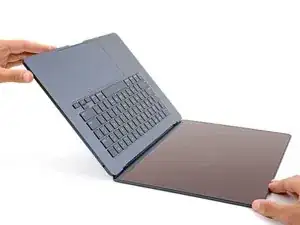
    • Öffne dein MacBook ganz und lege es mit der Tastatur nach unten auf einen Tisch, so dass das Display über die Kante nach unten hängt.

    Fully open the screen. I didn't first time, then had too. Small point, but if not fully open, it won't slide out.

    James Waters -

    Bonjour,

    Super tuto, mais il manque l'étape du capteur d'angle à la fin. Ce n'est pas trop gênant et j'ai bien réussi le changement de mon écran...

    Bravo et merci

    Bonne journée

    Emmanuel Perez -

  31. DDHjNYtMFpNJBXRa
    DDHjNYtMFpNJBXRa
    AQseKALcCBWYU3QO
    tBaQUqHcRYLp4wdB
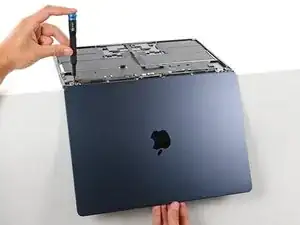
    • Halte das Display mit einer Hand fest und entferne mit der anderen Hand die sechs 4,3 mm langen 8IP Torx plus Schrauben, mit denen die Scharniere befestigt sind.

    • Halte das MacBook gut fest, damit es nicht vom Tisch herunter fällt.

  32. NFI6HXu2XLOM63Nk
    NFI6HXu2XLOM63Nk
    4Ol2duqIAU2YvCUr
    DmQgZPDDTORF4EEj
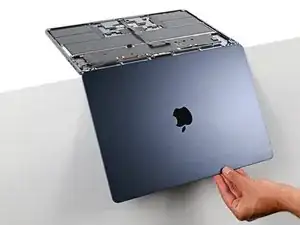
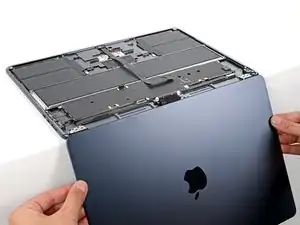
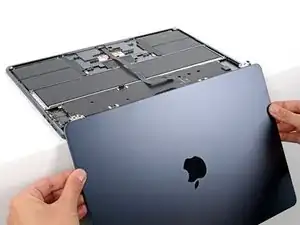
    • Halte das Display mit beiden Händen fest und hebe die Scharniere aus ihren Vertiefungen heraus. Entferne das Display.

    • Beim Zusammenbau:

    • Achte darauf, dass die Displayscharniere ganz geöffnet sind und führe sie in ihre Vertiefungen im Rahmen ein.

    • Setze die Scharnierschrauben ein und ziehe sie halbwegs fest.

    • Schließe das Display und kontrolliere, ob es gut ausgerichtet ist. Wenn es klackert oder schabt, dann richte es neu aus.

    • Ziehe die acht Displayschrauben fest.

Abschluss

Vergleiche dein Ersatzteil mit dem Originalteil. Möglicherweise musst du fehlende Teile übertragen oder Schutzfolien vom Neuteil abziehen, bevor du es einbauen kannst.

Um dein Gerät wieder zusammenzubauen, folge den Schritten dieser Anleitung in umgekehrter Reihenfolge.

Entsorge deinen Elektromüll sachgerecht.

Lief die Reparatur nicht wie geplant? Probiere es zunächst mit einigen grundsätzlichen Problemlösungen nach Reparaturen. In unserem Forum kannst du Hilfe bei der Fehlersuche finden.

Spencer Day

Mitglied seit: 14/09/22

95358 Reputation

28 Kommentare

Does the screen display normally after replacing it with the aftermarket screen? As far as I know, after 2021, MacBooks have problems with screen output when they are replaced with aftermarket screens.

https://www.ifixit.com/News/73288/m2-mac...

wellbinnn -

Hi! We tested swapping screens between two M2 MacBook Airs and didn't find any issues with the screen. The problem is with the MacBook Pros.

Spencer Day -

I checked your comment. Thanks for checking!

wellbinnn -

Is this doable without scratching or chipping the body if done using the ifixit tool kit?

John Mashconzone -

Hello! It's definitely doable! If you're worried, I would take extra care when standing the laptop up to make sure you set it on a surface that won't scratch the body. Also, be careful when guiding the hinges out of the frame to avoid brushing against the frame.

Spencer Day -

If I swap screens between two macbooks will they lose the true tone?

Без Имени -

Yes, unfortunately the true tone functionality will be lost even between two of the same devices.

Spencer Day -

500$ for the screen is too expensive :(( Can you replace it for me for free ? ;))

Eliot LeDragon -

I'm having an issue with the screen angle. I had to replace screens on three MacBooks. One worked great and the other two didn't. It works fine if the screen angle is open less than 30°. Opening further than this disables the screen and touchpad.

James Swafford -

Hi James! It sounds like there might be a problem with the lid-angle sensor. It might be folded in a weird way, at a strange angle, or damaged, causing the laptop to think it's closed when it's open. I would suggest taking the lower case off and checking the cable.

Spencer Day -

I've checked and reseated that cable. Tried another cable and no difference. If I put the original screen back on it works fine. It makes me think it has something to do with whatever actually transmits the angle to that cable. Is there a magnet or sensor in the hinges or screen itself? Is there a way to recalibrate it?

James Swafford -

Unfortunately, the only way to recalibrate it is by going through Apple. I'm surprised it was still happening after trying a different cable. As for magnets or sensors, I can check tomorrow and get back to you.

Spencer Day -

Hi James, I checked the area of the laptop around the lid angle sensor with magnetic viewing film today and it looks like there's a magnet very close to the lid angle sensor on the frame near the power button. I didn't see anything on the screen.

Spencer Day -

I’m having an issue of “water marks” inside the screen, so my macbook got washed up in a rain and the water is going inside the screen, right now the condition is all functioning well, the water already dried up but it left a huge marks inside the screen. Is it doable to tear the screen and clean it up and reassembly it again, thanks

Ichwanul Hakim -

Hi! No,You need to get new display.Cheers

Jerry Butcher -

Very nice presentation!

Do you know if the Air 13" M2 and M3 display screens are interchangeable?

Thanks.

Liem Nguyen -

I have followed these instructions and installed the new screen. I turned it on and everything started to work. Then after about 5 minutes the screen went off and it stopped working again. I opened the bottom again, undid the screen connectors and redid them. The computer turned on again and then went off after a couple of minutes. Is there a trick to getting those connectors seated correctly?

Samuel Lopez -

Hi Samuel! Reconnecting press connectors can be tricky. Here's a guide that covers some general information about them. For larger connectors like the screen ones, press down on one side until it clicks into place, and then press down on the other side. Don't try pressing down in the middle.

Spencer Day -

With regards to the lid angle sensor. My T2 from the fixit Manta driver kit doesn't fit and there is not a T1 in the kit. I had to abandon the repair :(

Jack -

Add this to your tool Kit! Precision T1 Torx Screwdriver, JAKEMY Professional Electronics Repair Screwdriver, Reinforced S2 Tool Steel

https://a.co/d/hqDGzdz

Macrepair SF -

Any suggestions to diagnose a blank screen after install ? Cable seems seated well. Are there steps or connections that if not properly made will disable the display ?

The removal part went well. Would love tips for re-attaching the tiniest screws like the lid angle sensor. It was often pulled toward the magnetized hinge metal before I could seat it.

befix -

Angle position sensor. I noticed on new aftermarket they now have an adjustment on the side on the hinge to correct this issue.

James Swafford -

I see various listings on eBay for "raw displays". Those type of listings are much cheaper compared to the fully assembled displays. Is it possible to change the display without changing the back cover?

Leonardo -

so... to replace a cracked LCD, one must replace the entire top of the laptop?

ioinva -

Excellent guide - thank you! MacBooks are getting like phones these days in how tightly everything fits. I do think this was an easier swap than older MacBooks. Having the antennae cables and everthing go up through the middle is easier than the old unibodies.
Anyway, fitted a new screen for a friend - 200GBP - considerable saving over Apple's pricing!

James Waters -

take this out of the guide "lid angle sensor cable screw" you dont have to mess with that. matter of face speakers can all stay too smh

Justin Davis -

After replacing my screen, the machine no longer sleeps when I close the lid. Yes, I checked pmset. It seems like the lid angle sensor needs to be recalibrated (my replacement screen did not include a lid angle sensor). The official Apple guide says that I need to perform System Configuration after replacing the screen (https://support.apple.com/en-us/108333), but I am not able to follow the steps there after step 7 - instead it asks me something about an offline session.

For now at least I have a working screen which is good.

There is a lid angle sensor recalibration tool https://notebooknerds.de/en/nerd-tool-1/ which I will probably try next.

David C -

Where can I purchase the Display Cable Cover Foam (step 11) and Upper Display Cable Cover & Plastic Securing Bracket (steps 14 &15). I can't seem to find them anywhere. These parts didn't come with my new screen, and I don't have my old screen to salvage them from

Jamie -